Why move from SNMP v2 to v3?
If you’re still running SNMP v2c on your network devices, now is a good time to make the switch. The difference in security posture is significant.
SNMP v2c authenticates using a community string — essentially a shared password — that is transmitted in plain text with every single request. Anyone who can capture traffic on your management network can read that string and use it to query (or in some configurations, write to) your devices. There’s no encryption, no per-user access control, and no way to verify that a message hasn’t been tampered with in transit.
SNMP v3 addresses all of that:
- Authentication — Username and password-based, with SHA-256 hashing. No more community strings in the clear.
- Encryption — The entire SNMP payload is encrypted (AES-256), so intercepted traffic is unreadable.
- Message integrity — Built-in checks confirm that data hasn’t been modified in transit.
- User-based access control — You can scope what each user is allowed to read or write, rather than granting blanket access to anyone with the community string.
For organizations subject to compliance frameworks like CMMC, NIST 800-53, or CIS Controls, SNMPv3 is often an explicit requirement. Even if it isn’t, running v2c on a modern security-focused network like a Palo Alto deployment is an easy gap for auditors to flag.
The one reason people put it off is configuration complexity — v3 takes a few more steps than typing a community string. Hopefully this walkthrough makes it straightforward.
The question everyone asks: what do I put for OID?
When setting up the SNMP view, the answer is 1.3.6.1. That single entry covers the entire MIB-II tree and is what most NMS tools expect to walk. Using anything more specific will result in incomplete or missing data on your monitoring side.
Step 1: Enable SNMP on the Management Interface
Navigate to Device → Setup → Interfaces → Management and ensure the SNMP checkbox is enabled. If you use a permitted IP address list, make sure your monitoring server’s source IP is listed there.
Step 2: Configure the SNMP v3 View
Navigate to Device → Setup → Operations → SNMP Setup.
- Set Version to V3
- Click Add under the Views section to create a new view
In the Views dialog:
| Field | Value |
|---|---|
| Name | everything (or any label you choose) |
| View | all (or any label — this is just a name) |
| OID | 1.3.6.1 |
| Option | include |
| Mask | (leave blank) |
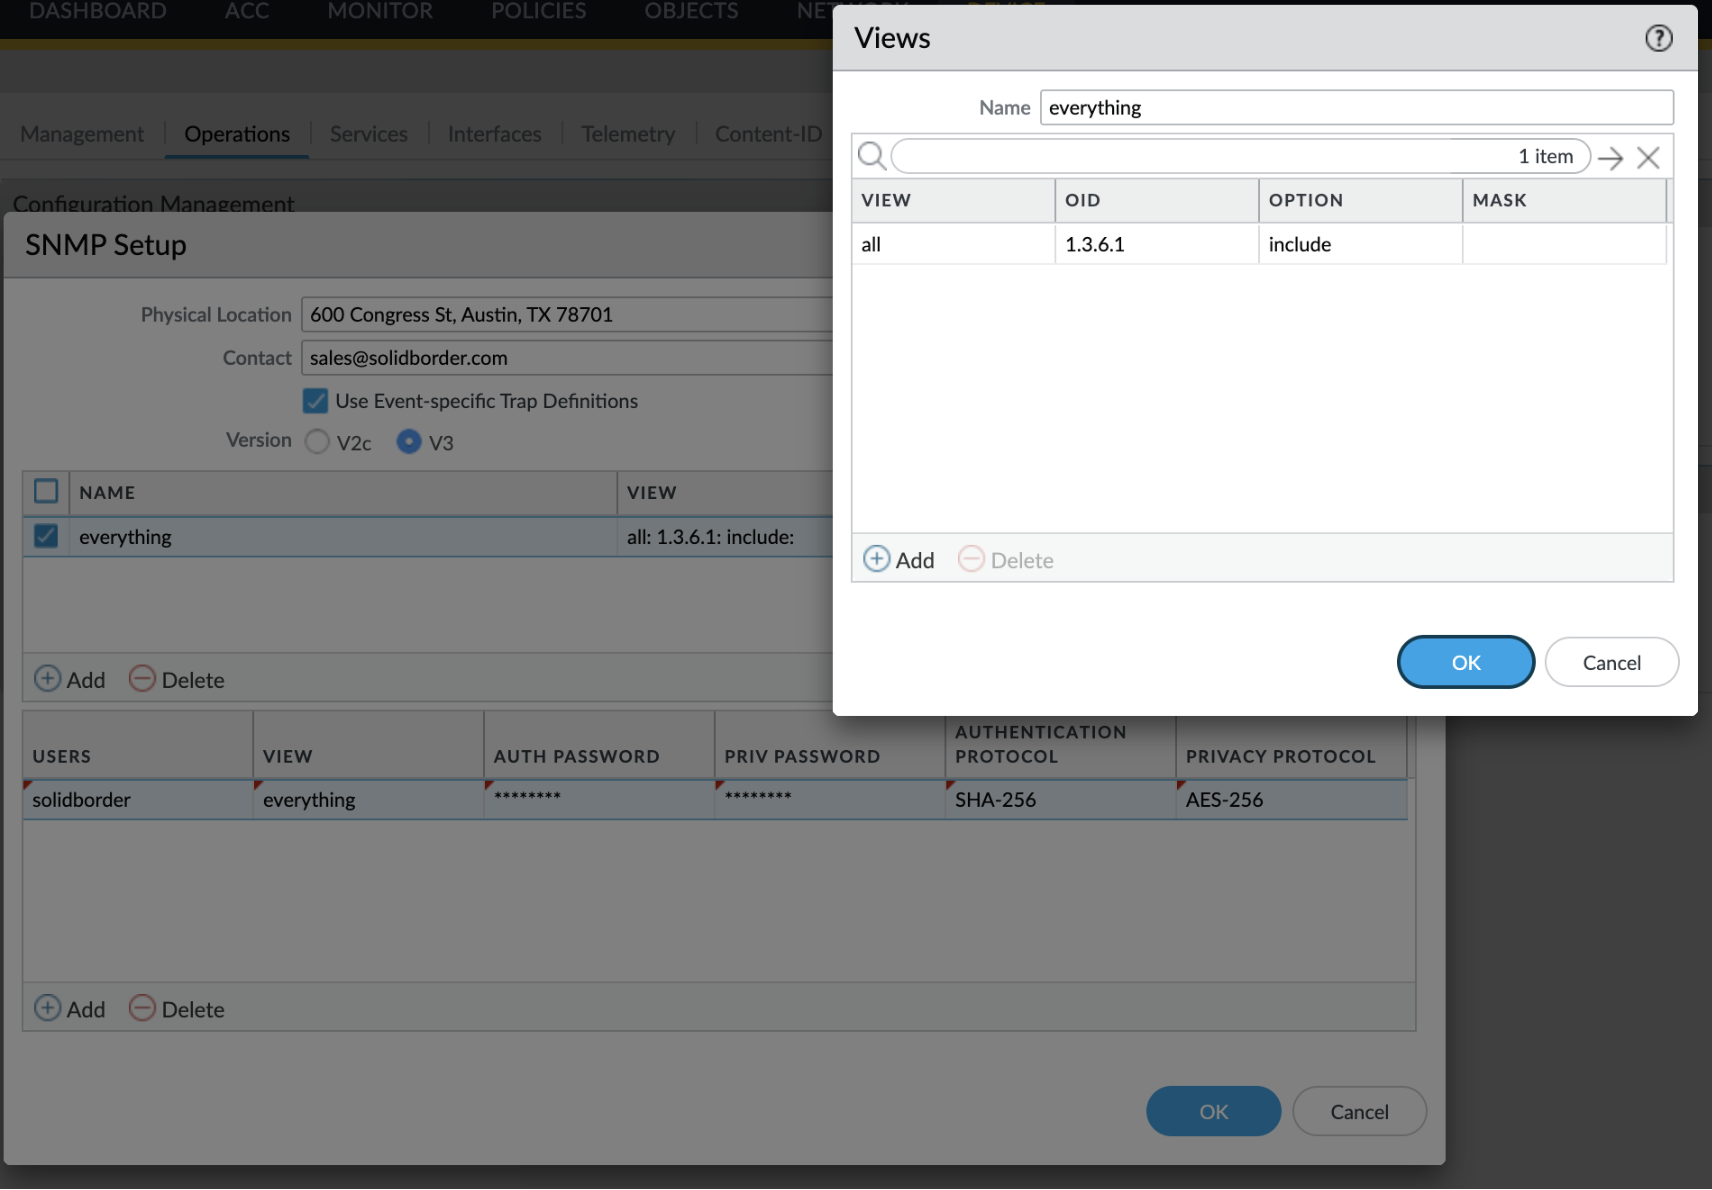
Step 3: Add an SNMP v3 User
Still in the SNMP Setup screen, click Add in the Users section:
| Field | Value |
|---|---|
| Username | Your choice (e.g. snmpmonitor) |
| View | Select the view name you created above |
| Auth Password | Set a strong password |
| Priv Password | Can match Auth Password or be different |
| Authentication Protocol | SHA-256 |
| Privacy Protocol | AES-256 |
These two passwords serve distinct purposes. The Auth Password is used to verify identity — it proves to the device that the request is coming from a legitimate, known user. The Priv Password is used for encryption — it’s the key that scrambles the SNMP payload so the contents can’t be read in transit. You can set them to the same value for simplicity, but using separate passwords provides an additional layer of defense: someone who obtains the Auth Password still can’t decrypt the traffic without the Priv Password.
Click OK and commit the change.
Caution: rtp-base App-ID
We’ve seen cases where SNMP v3 traffic shows up in the firewall logs classified as the application rtp-base (with service set to application-default) rather than snmp. If your security policy is app-based and you’re blocking unknown or unexpected applications, this can silently drop your SNMP polling. Check your traffic logs if monitoring stops working after a policy change — and consider creating a specific rule for your monitoring server’s source IP.
Derek del Barrio is CEO and Lead Systems Engineer at Solid Border. He’s spent over 25 years in IT security and has had a soft spot for Palo Alto Networks firewalls since 2009.